'Tis the season! For ghouls and ghosts and goblins, that is. And what holiday would be complete without seasonal cupcakes to liven up the party?
I have been utterly inspired by the Halloween cupcakes I've seen by my favorite local cupcake shop, Trophy Cupcakes. Just check out their twitter stream for some mouthwatering pictures of vampires, Frankenstein, and witch hats. But remember that you don't need expert piping skills or art classes to make great spooky designs--their candy corn cupcakes are one of my favorites because they're so easy and yet so effective.
I made these cupcakes last Halloween, and I've been waiting until now to share them with you. So bake up a dozen chocolate cupcakes, pull out your food colors and assorted candies, and we're off!
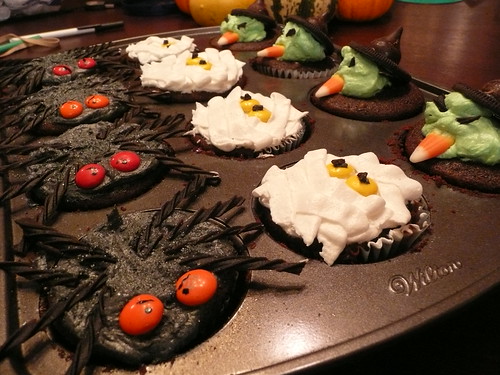
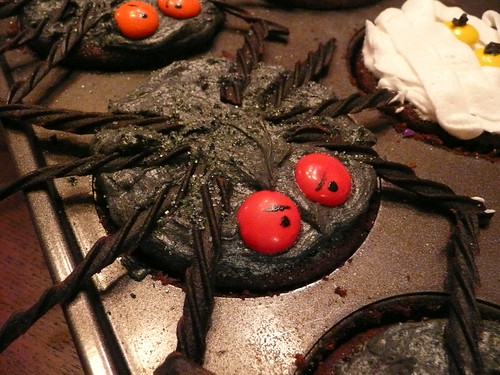
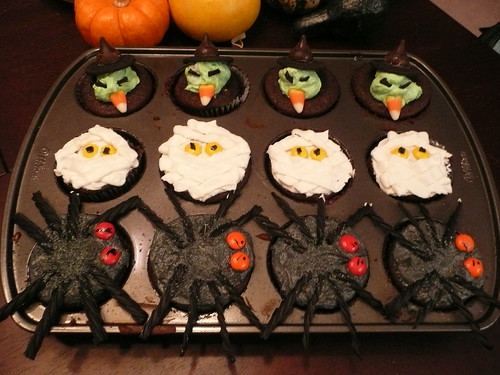
To make spiders: Spread grey/black frosting on the top of a cupcake. Cut black licorice into quarters lengthwise with kitchen shears or a really sharp knife, then cut each skinny licorice bit into 1-2" pieces. Press four licorice pieces into the frosting on each side of the cupcake. You can use any small colored candies for the eyes--I used M&Ms because they were available. Stick a toothpick in black food coloring and use it like a pen to draw a mean expression on the eyes. (Edible decoration markers would almost certainly be easier if you happen to have them, but I didn't bother.) In a small nonporous bowl, toss a tablespoon of white sugar with a few drops of black food coloring. Sprinkle the dyed sugar over the cupcakes to make "shiny" spider bodies.
To make mummies: Spread a thin layer of white frosting over your cupcake. Put two candies about 1/3 of the way down to be eyes. Using a flat piping tip (such as Wilton #44 or 45), pipe short flat strips of frosting to mimic bandages, leaving the eye area open. Vary the direction of your strokes and use overlapping diagonals to make the mummy look "wrapped." Attach a very small piece of licorice to the eyes with a dab of frosting, or just use the toothpick-in-food-coloring trick from the spiders to create pupils.
To make witches: Using a dinner spoon, put a blob of thick green frosting down in the middle of your cupcake. (Mix in a bit more powdered sugar if your frosting is too thin to stand on its own; you don't want the witch heads to turn into puddles.) Open an Oreo, scrape off the white filling, and unwrap a Hershey's kiss. Attach the two with a dot of frosting to make a hat, and set them at a jaunty angle on your green blob. Press a piece of candy corn in near the bottom to be a nose, and use two slivers of black licorice tilted inwards to make mean-looking eyes.
Et voila! Adorable Halloween cupcakes/edible decorations for your dinner table. Perfect.
Do you have any other Halloween decorating ideas? I'll be making a batch of cupcakes tomorrow and would love to give them a try.
Wednesday, October 28, 2009
I saw old autumn in the misty morn Stand shadowless like silence, listening To silence
On Friday, The Son turned 17 years old. Dinner that night was a rare and lovely time for us. The Son was feeling well enough after suffering from the flu to sit at the dinner table.
Daughter #1 was down from Seattle for a friend's wedding. She joined us for dinner and put the finishing touches on The Son's birthday cake.
It was just the five of us, the way it was for years before the girls grew up and moved away to college and careers.
Friends of the Son's popped in, bringing balloons and silly gifts and staying for a slice of cake.
Daughter #2 drove in from college to help celebrate the Birthday Boy and get in her pug fix.
We ate and drank and laughed and enjoyed each other's company so much.
By midnight, Husband and I were down with the worst twin cases of flu imaginable.
But for a few hours, we were all well and happy and aware of our many blessings.
Yesterday I tried out one of my new giant pastry tips on some mini cupcakes. (Recipe for the Pumpkin Spice Cupcakes w/ Cream Cheese Frosting at end of this post.)
When I bought these new decorating tips, the first thing I noticed is how huge they are (see yesterday's post).
But not until I was ready to frost cupcakes did I realize that the box of six supersize tips came with no coupler! (A coupler is a two-part plastic thingummy that holds the pastry bag tight around the decorating tip.) Maybe the weight of all the frosting would just hold the tip in place? Deciding to try, I dropped a tip into the pastry bag and just plopped all the frosting in:
It worked fine! And I was off to the races. As I went along, frosting and squishing and racking up the mini cupcakes, I thought about how easy it is to decorate cupcakes and cakes if you know a few little tricks. So, here they are, to demystify the process and inspire you, I hope.
Tip #1: Improvise. (See above paragraphs.) Decorating with frosting is too darn fun (and too darn tasty!) to let a little thing like the lack of a plastic thingummy stop you. If you don't have any pastry bags or tips, stuff the frosting into a zip-style plastic bag, snip a tiny bit off one corner, and go free-form with your stylin'.
Tip #2: Use the cuff-and-glass method to fill a pastry bag with frosting. Roll the bag's larger end down over itself to form a generous cuff. Then stand the empty bag upright in a tall drinking glass. Now filling the bag with frosting is a snap. Here's a shot of the Cream Cheese Frosting in the bag. Yum-mee!
Tip #3: Gently push the frosting down toward the tip by lying the filled pastry bag down on a counter. This gets rid of any unwanted air pockets. If you try to do this while holding the bag in the air, frosting can shploop out either end, and you don't want that! And yeah, I said "shploop."
Tip #4: Fold and roll the bag to prevent the frosting from backing out all over your hands as you work. First, fold the corners of the open end toward each other, then roll the open end up tightly toward the tip end. Like-a-this:
Gently roll until frosting begins to peek out the decorating end:
Tip #5: Use the fridge to modulate the temperature, and thus the squishability, of the frosting. If it feels too soft and isn't coming out in crisply defined shapes, put the frosting bag back in the drinking glass and pop it in the fridge for a few minutes. If the frosting gets too hard, leave it on the counter until it feels like the right consistency. (Don't use the microwave; you've got a metal tip in there, and nuking the frosting might warm it up unevenly.)
Tip #6: Practice making decorations on a plate before you start decorating. You can always scoop up the frosting and stick it back in the bag. Or, save your ugliest attempts for yourself and your family/best friends. Like this one, below. It's too peak-y in the middle and looks...stupid. So it became part of my lunch!
Now, these are looking better! I made these, below, by pointing the decorating tip straight down at the cupcake, then pushing out some icing until it covered about half the top, then pulling up with a quick motion to make the peak:
Tip #7: Add jimmies, nonpariels, etc. immediately after icing. If you try to add your decorations to a cake that was iced a while ago, the icing has hardened and your decorative bits won't stick nicely. Here's part of my decoration stash:
Ah! I spy the perfect decorations for this project:
Itty-bitty gingerbread people! (Yes, I believe in equality among cupcakes. Don't you?) Here's a look at the unenlightened label:
Tip #8: Use tweezers for precise placement. No, not the ones from your bathroom! Buy an inexpensive pair of tweezers from the drug store and dedicate them to strictly cake- and cookie-decorating use. And when you're picking through irregular shapes like these gingerbread folks, spread them out on a white surface so you can sort through them easily and weed out any oddballs. Unless you like using oddballs, of course.
Use the tweezers to place the decors exactly where you want them. I think three per cupcake is just about right for these three-bite cuties:
So after doing some ginger people, I sprinkled some of the mini-cakes with mini orange balls (see below).
Tip #9: Use a jelly roll pan under your decorating area. If you are using a lot of sprinkles, and/or if you want to minimize waste, the pan will catch any sprinkles that roll off. From time to time, you can tip the loose sprinkles into your hand and re-shake them onto the cakes:
Tip #10: Move the cupcake, not the pastry bag. Remember when you were in 2nd grade and Mrs. Ratchley said the best way to cut a difficult shape out of construction paper is to hold the scissors still and move the paper around? Same thing applies here.
To achieve this swirly shape below, I used the same pastry tip as before but held the cupcake in my left hand (I'm right-handed, so the bag of icing goes in your dominant hand). Then I cocked my left wrist, and as I applied the icing, I slowly "unwound" my left hand as I piped out the icing. That works much better than trying to twirl the hand that's holding the icing bag. It has enough to do, believe me!
Pretty, huh? I picked up the next tip from watching the pros at Trophy Cupcakes in Seattle.
Tip #11: Channel Mr. Spock on "Star Trek." To move iced cupcakes safely, turn your hand palm up and create a "Live Long and Prosper"shape. Gently grasp the cupcake around the paper between the vee made by your fingers to move it. This method keeps your hands below the decorated top and "shoulders" of the cupcake. It also helps prevents your knuckles from accidentally hitting the icing of a neighboring cupcake:
Here's my last tip:
Tip #12: Don't throw out leftover icing! There are so many fun things you can do with it instead. Pipe a big button of icing to attach two cookies together and create a sandwich. Ice a short greeting like "Hi!" or "I [heart] U" on somebody's pancakes or waffles. Squeeze a little icing on a slice of pear or apple for a fall treat. Melt a square of chocolate atop a Graham cracker in the microwave, and add a healthy blob of icing instead of a melted marshmallow, then top with another cracker.
Here are the recipes. Hope you enjoy them:
Pumpkin-Spice Bread [from Mademoiselle magazine, ca. 1978]
[brackets throughout recipe are my additions and suggestions]
1-1/2 C. granulated sugar
1/2 C. mayonnaise
2 eggs
1-2/3 C. flour
1/4 tsp. baking powder
3/4 tsp. salt
1 tsp. baking soda
1/2 tsp. grated nutmeg
1 tsp. cinnamon
[1/4 tsp. of cloves is nice, too]
1 C. canned plain pumpkin [not pumpkin pie mix]
[1/2 C. raisins and/or chopped nuts, if desired]
In a large mixing bowl, cream together granulated sugar and mayonnaise. Add eggs and beat thoroughly. Sift together the flour, baking powder, salt, baking soda, and spices. Alternately add dry ingredients with the pumpkin [and raisins and nuts, if desired] to the batter.
Pour into a loaf pan and bake at 325 degrees Fahrenheit for 1 hour, 15 minutes or until a toothpick inserted in the center comes out clean. [Remove from oven; run knife around edge of pan to loosen bread. Let sit in pan for 20-30 minutes. Turn out on a wire rack to finish cooling.]
[Makes 4 or 5 mini loaves; bake 50 minutes.]
[Makes 18 regular cupcakes; bake approx. 30 minutes.]
[Makes 36 mini cupcakes; bake about 20 minutes.]
Cream-Cheese Frosting [This recipe has been in my family three generations. It is my go-to frosting for carrot cake but works beautifully on many other cakes, too.]
In a large mixing bowl, beat the first three ingredients until light and fluffy. Gradually add the sugar until smooth. If the frosting seems too thick, add a few drops of milk to thin it out. Makes enough to fill and frost a three-layer, 9-inch cake.
Hee hee! There's still frosting in my refrigerator!
 The lamps are lit...
 The decorations are in place...
 The neighbors are all ready...
 Boy, are they ready!
 The pumpkins are carved...
 Happy Halloween!


 He won't be bothering your Pomeranian any more, ma'am.
 Daughter #1 was down from Seattle for a friend's wedding. She joined us for dinner and put the finishing touches on The Son's birthday cake.
 Friends of the Son's popped in, bringing balloons and silly gifts and staying for a slice of cake.
 Daughter #2 drove in from college to help celebrate the Birthday Boy and get in her pug fix.
 By midnight, Husband and I were down with the worst twin cases of flu imaginable.
 "Hangs, white and calm, the hunter's moon."
 --John Greenleaf Whittier, 1807-1892


 Wrinkles...
 Cowlicks...
 Nose folds...
 Neck scruff...
 Short fur...
 Pink tongues...
 Curly tails...
 Quietude...
 and laughter!
 It worked fine! And I was off to the races. As I went along, frosting and squishing and racking up the mini cupcakes, I thought about how easy it is to decorate cupcakes and cakes if you know a few little tricks. So, here they are, to demystify the process and inspire you, I hope.
 Tip #3: Gently push the frosting down toward the tip by lying the filled pastry bag down on a counter. This gets rid of any unwanted air pockets. If you try to do this while holding the bag in the air, frosting can shploop out either end, and you don't want that! And yeah, I said "shploop."
 Tip #4: Fold and roll the bag to prevent the frosting from backing out all over your hands as you work. First, fold the corners of the open end toward each other, then roll the open end up tightly toward the tip end. Like-a-this:
 Gently roll until frosting begins to peek out the decorating end:
 Tip #5: Use the fridge to modulate the temperature, and thus the squishability, of the frosting. If it feels too soft and isn't coming out in crisply defined shapes, put the frosting bag back in the drinking glass and pop it in the fridge for a few minutes. If the frosting gets too hard, leave it on the counter until it feels like the right consistency. (Don't use the microwave; you've got a metal tip in there, and nuking the frosting might warm it up unevenly.)
 Tip #6: Practice making decorations on a plate before you start decorating. You can always scoop up the frosting and stick it back in the bag. Or, save your ugliest attempts for yourself and your family/best friends. Like this one, below. It's too peak-y in the middle and looks...stupid. So it became part of my lunch!
 Now, these are looking better! I made these, below, by pointing the decorating tip straight down at the cupcake, then pushing out some icing until it covered about half the top, then pulling up with a quick motion to make the peak:
 Tip #7: Add jimmies, nonpariels, etc. immediately after icing. If you try to add your decorations to a cake that was iced a while ago, the icing has hardened and your decorative bits won't stick nicely. Here's part of my decoration stash:
 Ah! I spy the perfect decorations for this project:
 Itty-bitty gingerbread people! (Yes, I believe in equality among cupcakes. Don't you?) Here's a look at the unenlightened label:
 Tip #8: Use tweezers for precise placement. No, not the ones from your bathroom! Buy an inexpensive pair of tweezers from the drug store and dedicate them to strictly cake- and cookie-decorating use. And when you're picking through irregular shapes like these gingerbread folks, spread them out on a white surface so you can sort through them easily and weed out any oddballs. Unless you like using oddballs, of course.
 Use the tweezers to place the decors exactly where you want them. I think three per cupcake is just about right for these three-bite cuties:
 So after doing some ginger people, I sprinkled some of the mini-cakes with mini orange balls (see below).

 Pretty, huh? I picked up the next tip from watching the pros at Trophy Cupcakes in Seattle.
 Here's my last tip:
 Hee hee! There's still frosting in my refrigerator!
